
2
Bold Hatching
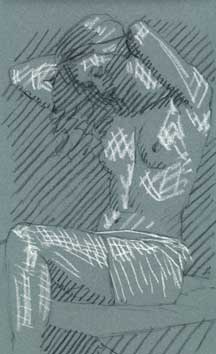
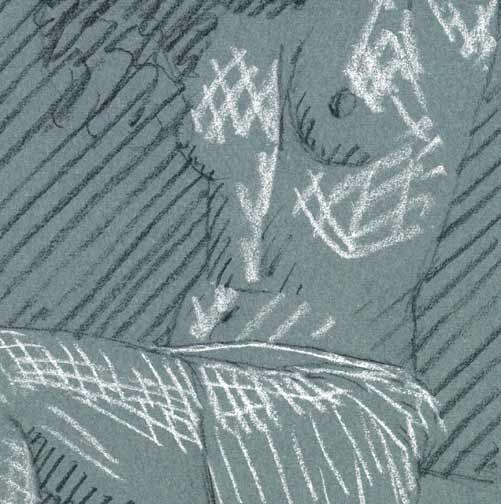
As explained in the eyewitness account of Prud'hon's method, the outline was rubbed to a pale mist before moving to this step described below. It is not clear to me that Prud'hon always rubbed out his outlines. I chose not to rub out the outline in this drawing.Step 2 requires close observation and fore planning.
White
Observe the forms holding highlights. Use your softest white to draw the highlights. You are drawing anatomy here, no matter how coarsely. Highlights run along the peaks of forms, and in the troughs between them.Highlights are:As seen in the example by Prud'hon, this is a stage where your marks should be generous and openly spaced. Cross hatching is applied mainly to allot enough material for eventual smudging and modeling. Cross hatching can be directed obliquely over the forms, and is typically destined to be stumped thoroughly, which leaves a fluid haze and ghostly hatches. If all goes well, selected areas can be left 'as is' before or after first stumping, leaving a good sense of anatomy and lighting. A good setup requires that you keep the coarse hatches firstly on the highlights and secondarily on the main lights. (The lower leg in this drawing is destined to be stumped once, and never touched again.) If you place the hatches too close together, the stumped out drawing will be opaque over the blue paper, which cancels the paper's purpose as an undercurrent, and denies the possibility of elegant open marks in a final effect.
linear on cylindrical and conical forms
Black
Apply black to the shade zone using parallel diagonal open coarse hatches. Cross hatch at the core of the shade zone, or in extra dark areas like caves, or at the joints of projecting, bent limbs (not an issue in this drawing). As with the whites, you are allotting enough material to eventually smudge into the foundation as a medium dark tone. At this stage, you can be deciding whether the shade zone will be simpler, with less anatomical description, than the lit side.