4
Hatch White


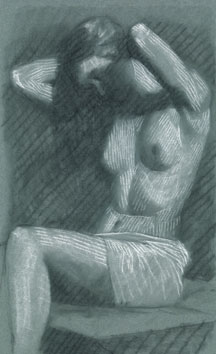
Step 4 starts with the lights. Once the smudging stage has been taken to the limit you wished for -- you might even have left some areas untouched -- you can now clarify and assert the lights.


You might need to do a little clean-up before proceeding.

When stumping, you may have overstepped your mark. Perhaps low light and halftone should be untoned (This particular demo does not have clean-up).

ERASE. At this time you can erase back to the paper where you think blue only- is best.

RE-OUTLINE. Smudging causes the outline to lose its clarity, so if necessary, go back and clarify important outline at this stage.


Detectably, Prud'hon gave most areas that required anatomical specifics several passes. This process hid previous steps, leaving me to wonder how the work evolved. My sense is that after first bold hatches, he proceeded purposefully, using fine hatches that may or may not have matched the final directions.

Here is how the above drawing proceeded:
First, a bit of outline marked plane changes and consequent lighting. For example, see the horizontal lines that mark the folds in the abdomen.

Next, I ran SHORT hatches either at

the same angle as the outer form's edge, or
with the form's length,
Or, although not done here, hatches can run obliquely on form (I have seen traces of oblique hatches just below the final hatches in Prud'hon drawings).

Materials Use a white chalk that freely releases the color, so you don't have to bear down. Use a hardness that can erase and smear, and will leave a ghost with stumping. Use either of the Contes, depending on how dense you want your white to be. The softer Conte will be the more dense. This drawing uses the harder white (HB) at this stage.

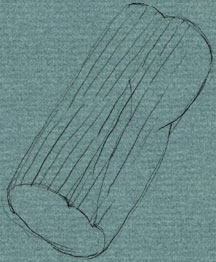
Again, these hatches may be directed
oblique to the form if you think that would be right; or you may direct them with its length. More about this later...


More about hatches

To emulate Prud'hon, apply the hatches in rows, NOT RANDOMLY.


As the rows add up, you get a continuous tone.
The hatches only slightly interlock:


On another matter, most of the hatches, whether black or white, should be applied to each separate form [A, below]. Routine hatching across the all the separate forms [B, below] will cause a loss of the forms.
Even though the hatches share the same direction, they should still be separately applied to separate forms.
An exception to this rule would be diagonal hatching in shadows, intentionally applied to obscure form.


AB


Yet more on applying the hatches
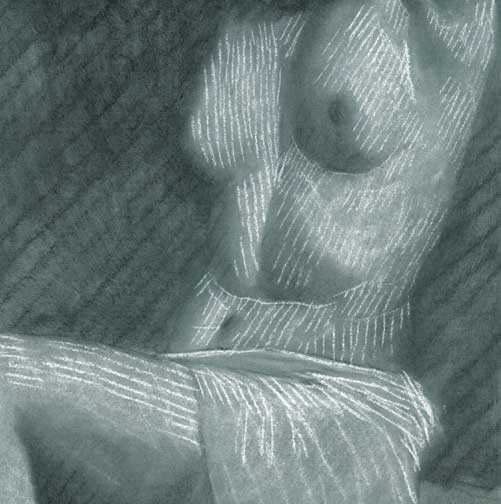
Prud'hon's particular hatching technique is eccentric. It is instructive to take a guess at how he worked, try it out, and see if you think your work improves. I can attest that the struggle to render in his manner (which is difficult) has strengthened my painting.

Here are some ways to keep the hatches crisp and on target.


Keeping line crisp. This is one of those things that you need to try. The concept is so simple you might not think to make it a habit:

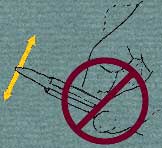
While drawing, keep the chalk at a low angle to the paper.

If you pull or push the chalk [in the direction of its length] and rotate between strokes to refresh the tip, you will have a permanently crisp line. If you don't rotate, the tip will soon wear and broaden.

If you swing the line, rather than pull or push, the resulting line will be broad.


Keeping the line on target. To direct your lines precisely, add this skill to your bag of tricks:


For better visibility,
push your chalk along the path you wish to draw. When you drag, the tool hides the desired path, so you might miss your placement.


Next Page: Demonstration: Step 5 -- Hatch Black

Updates | Discovering Prud'hon: Introduction to a Lesson on Technique | Why Is His Drawing Unique & Obscure? | Observations: Prud'hon's Materials | Discussion: Modern Materials | How to Make Your Own Better Black Chalks | Supply List: Black and White Chalk on Blue Paper | Observations: Parameters of Technique | Theory: Best Guess at Prud'hon's Step by Step Approach | Demonstration: Step 1 -- Outline | Demonstration: Step 2 -- Bold Hatching | Demonstration: Step 3 -- Stump Out Hatches | Demonstration: Step 4 -- Hatch White | Demonstration: Step 5 -- Hatch Black | Demonstration: Step 6 -- Lightly Stump | Demonstration: Step 7 -- Apply White Again | Demonstration: Step 8 -- Add Black Again | Demonstration: Step 9 -- Hatch, Tortillon, and Hatch Again | Demonstration: Step 10 -- Finishing Refinements | Demonstration: Steps 1 through 10 -- Visual Summary


What's New? | Shortcut  


Entrances: | Studio -| Alzofon Art Institute -| Idea Library | Academy | Guest Wing |


Rebecca Alzofon can be e-mailed at rebecca@art.net
This page updated July 16, 2003
1999 by Rebecca Alzofon. All rights reserved.