
Method--Step by Step
![]()
![]()
![]()
Method--Step by Step
Disclaimer: I didn't see Prud'hon work, and I have never seen any artist make a drawing using his technique. Sure, I've often made--and seen made--hatched and cross-hatched black and white drawings. There is no mystery to contemporary hatching techniques. But Prud'hon had a very particular and different procedure that was both eccentric in its direction, and obscure in technique. The hatches are short, uncrossed, very open, equally spaced, mostly parallel to the form's length; and most problematic, the hatches are set against extensively stumped underdrawings. Stumping obliterates evidence of the under drawing's application. In many drawings, it appears that several hatched layers were applied, then stumped before completion, but because of the extensive stumping, I can't decipher how he got from beginning to end. Since I first uploaded this discussion, a reader sent me news of a quote from an eyewitness to Prud'hon at work. It offers some validation to my speculations. Mostly, my questions remain unanswered, and a few new questions have arisen.
This is what I assume to be Prud'hon's drawing stopped in the second stage. (The first stage would be the basic line setup.)
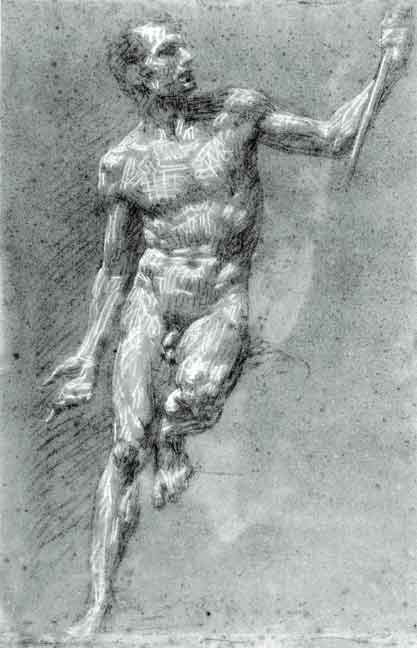
Pierre-Paul Prud'hon
Black and white chalk on blue paper
If laid out properly, these coarse marks can be preserved to the finish (I'll call them "unfinished" areas). Although the artist elects to go further with the drawing in selected areas, well placed coarse marks are complete in their own right, and contribute to the interest of the entire drawing.
Once this stage is complete, the next step is to stump generously all areas that do not call for the first coarse hatches...

As shown above, much of the drawing remains as the stumped out first layer--here, it's the extremities. Note the way that ghosts of the original hatches remain, serving as diffused highlights and form direction from light to shade. Black and white are slurred together to make gray in this drawing, but in other drawings the white, black and blue paper are segregated. Since more treatment follows for selected areas, I'll call this stage "unfinished..."

As I mentioned earlier, several passes can be made, stumped over, and then rehatched and even stumped again, but I don't know with certainty whether there is a pattern of attack to this phase, because stumping obliterates the under treatments. The above image seems to suggest that final hatches can be made over the first stumping, or second, or third, etc.
At some point a fresh iteration of the outline is selectively applied.
![]()
![]()
![]()
![]() Next Page: Demonstration: Step 1 -- Outline
Next Page: Demonstration: Step 1 -- Outline
What's New? | Shortcut
Entrances: | Studio -|
Alzofon Art Institute
-| Idea Library | Academy | Guest Wing |
Rebecca Alzofon can be e-mailed
at rebecca@art.net
This page updated July 16, 2003
![]() 1999 by Rebecca Alzofon.
All rights reserved.
1999 by Rebecca Alzofon.
All rights reserved.