Kodak High-speed Infrared
I've received enough questions about this film that I've decided that
it's worth writing down a few notes to share with people.
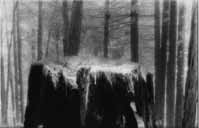 Kodak high-speed IR comes in two sizes:
35mm and 4x5 sheets. The 35mm
is easier to work with, cheaper, and has a more pronounced grain which
is one of the things that make this film so distinctive.
A good example of
this grain is the stump image
[big].
Kodak high-speed IR comes in two sizes:
35mm and 4x5 sheets. The 35mm
is easier to work with, cheaper, and has a more pronounced grain which
is one of the things that make this film so distinctive.
A good example of
this grain is the stump image
[big].
 The 4x5 sheet film, like any other large-format film, gives you a much
richer depth of intensity, and much finer grain. The
water temple image is a good example of this.
[big]
The 4x5 sheet film, like any other large-format film, gives you a much
richer depth of intensity, and much finer grain. The
water temple image is a good example of this.
[big]
There are other manufacturers of infrared film, most notably Konica, but
these other films do not see as far into the IR as Kodak and I've never
tried them.
Handling
Infrared light has longer wavelengths than visible light, which gives it
the ability to bend around corners more ("diffraction"). This is what
gives IR film some of it's more striking effects, but it also causes
some problems. IR light can get through the felt light baffle in film
canisters and fog the film during handling. It can also pass through
some kinds of cloth and plastic. For this reason, you must take the
following precautions:
- Not all cameras work
- Cameras with plastic bodies may allow IR light to reach the film. As
far as I know there's no list of which cameras do this, so you'll just
have to find out the hard way. Metal-body cameras work fine. I've never
had any trouble with my Minolta SRT 201, Minolta XG-M or Minolta X-700.
- Load film in a darkroom.
- You need to keep the film canister out of the light at all times.
- Changing bags don't work very well.
- I've used them when nothing else was available, but you can see the
fogging in the flim leader afterwards. Luckily, the combination of
changing bag and felt baffles protected the film well enough, if not
perfectly.
Exposing
Kodak high-speed IR is a little tricky to expose right. The film
sees a band of light that neither your eye nor the light meter can see,
so it's difficult to know how to expose it and any attempt to just
select a meter setting would be in vain.
Anyway, with all that ambiguity, I have a rule of thumb that works
pretty well for me: In the cool light of the evening and morning,
treat the film as ASA 25. In the warm light of the mid-day, treat the
film as ASA 100. In the hot light of an incandescent bulb, treat the
film as ASA 400.
The best thing you can do is bracket your exposures a lot. In fact,
the "stump" picture actually came from my first test roll when I was
trying to determine the exposure to use. You should bracket every
exposure +/- one and two stops (for a total of five exposures) if you
can.
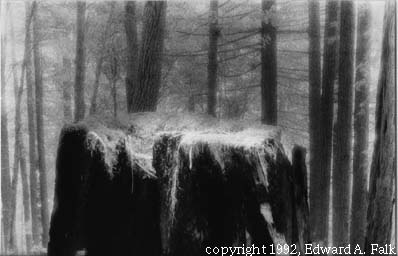
The other reason to bracket is that different exposures will cause
different effects on the film. One exposure may give you a sharper
image or more pronounced grain, while a longer exposure may give you
more of that "glowing" effect. A good example of this is the trees
in the forest photo in which the long exposure brought out the detail
in the tree trunks in the foreground while causing the glowing effect
in the background.
(BTW, the glowing effect isn't entirely from the infrared light, but
from the fact that the film has no "anti-halation" backing. That's an
opaque backing on regular film that stops the light that makes it
through the emulsion and keeps it from bouncing off the back of the
film. Kodak IR has no anti-halation backing and so the light bounces
back and forth inside the thickness of the film, causing the highlights
to diffuse.
(Of course, some of the effect comes from IR's long wavelength which
causes it to "bend" around obstacles that short wavelengths can't
pass. That's why the felt light trap in the film cans don't work
very well and you have to load the film in a dark room. Black changing
bags don't work perfectly either -- you'll be able to see the film leader
has been fogged if you change film in a changing bag.
Above all, EXPERIMENT! This is a very difficult film to predict,
but the surprises are usually pleasant.
Processing
This is the easy part. Just develop normally in D-76 according to the
directions. Just remember to keep the film away from light when loading
it into developing cans. Don't use changing bags. To be on the safe side,
I use metal developing cans.
Good luck and have fun.
--ed falk
![[big]](Images/stump.jpg)