Advanced Drawing: Wash Drawing & Hachure
Supply List
PAPER
- One or both of these pads:
9 X 12 Meridian Drawing -- a beautiful cream paper, slightly rough finish, ideal for hachure combined with washes. Buy this one if you don't want to buy both.
9 X 12 Meridian Paper for Pens -- a slick bright white paper, ideal for hachure. Washes look sort of okay.
- Small folio to keep separated drawings.
INK
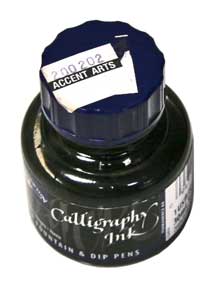
- Winsor Newton Calligraphy Ink, "Black" (glass bottle with blue plastic screw-on lid, specified for use with dip & fountain pens). I have tested various inks, and this one will give best overall effect on paper, especially when combined with the watercolor (below). Loaded into fountain pens, this ink flows sluggishly. Just wet the tip to get it moving again. Do not leave pen loaded with this ink for more than two days.
DO NOT SUBSTITUTE Winsor Newton "Matt Black" or "Blue Black" for this class.
WATERCOLOR
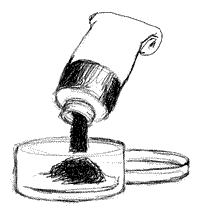
- Tube or cake of Ivory Black Watercolor, any non-student quality brand.
If you buy a tube, squeeze a little into a cup or tray and allow to air dry.
example:
- Mixing tray with two or three compartments, or individual wash jars, as shown in the laptop organizer (below).
BRUSHES
- Waterbrush, medium sized, round
- Winsor Newton Sceptre Gold II Series 101: #'s 4, 8, 10
- Winsor Newton Sceptre Gold Series 202: # 1
These Winsor Newton sable-synthetic blend brushes are quite reliable, but if you can, water test your brushes in the store before buying: ask clerk to provide a cup of water. Wet the brush and roll the tuft on the back of your hand from different sides. If the brush splits into two segments, re-wet and check again for the split. If the spit recurs in the same place, try another brush.
- Substitutions: You may substitute these brushes with any similar sable-synthetic blend or pure sable brushes that you prefer.
Tuft dimensions (diameter at ferrule) X (Length) inches are approximately:
a. 1/4 X 1 3/16
b. 3/16 X 1
c. 1/8 X 1/2
d. 1/16 X 1/2
- Transport brushes in a way that prevents damage to the tuft. Rolled brush protectors are a BAD idea.
PENS -- Either Dipping (inexpensive) or Fountain (expensive)
If you never tried pen and ink before, just buy the dipping pens. Fountain pens are fine for those who love pens and want to splurge.
- DIPPING: Speedball Sketching Pen Set, "Project Set" #2964 (or, same contents sold individually -- two sizes pen holders and these six nibs: Hunt #'s 56, 99, 512; 102, 104, 107). Always remove wet nibs from holders and wipe clean and dry after use.
- FOUNTAIN: Three pens with different line weights -- Extra fine, medium, and broad, with converter cartridge for loading your own ink.
I recommend Lamy Safari with different color holder for each point.
You can find good values online, such as from http://pendemonium.com.
If you already own fountain pens, use yours.
NOTE: Dipping pens make different looking lines than fountain pens. Dipping pens might provide more reliable lines with the recommended ink, but frequently need to be recharged. Fountain pens are tidy, but they can clog. Using dipping pens might lead to ink bottle spills. Each choice has pluses and minuses.
PENCIL
- Either of two choices: HB, wood clad kept sharp with portable sharpener, or mechanical type with .09 mm or less diameter lead.
ERASING TOOLS
- Soft vinyl eraser, such as Factis or Magic Rub -- do not bring extra firm eraser.
- Mr. Clean Magic Eraser, available in household cleaning supply isle in various stores. I bought mine at Safeway.
"2 pack" comes in a 4.6 X 2.4 X 1.0 inch box.
- X-acto knife with either #11 or #16 blades (for cutting friskets).
- I will provide to you (at cost) pieces of acetate for frisket making.
WATER KEEPERS:
One of each of the following:
- Water bottle
- Small water dispenser squeeze bottle
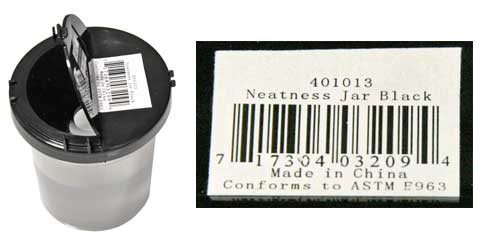
- Artist's Water cup -- strongly recommend "Neatness Jar" which limits spills. I found mine at Accent Arts. Here is what it looks like:
MISCELLANEOUS
- Light weight 12" straight edge
- Your favorite drawing aids, such as, measuring stick, tracing window, and any other stuff you like
- Soft paper towels or cotton rag.
- Case or bag to carry your supplies.
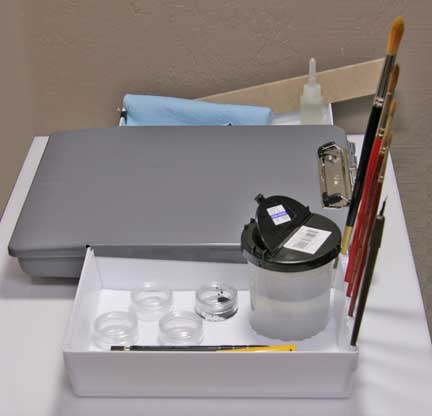
COMPACT LAP/TABLE ORGANIZER
This is going to be up to you:
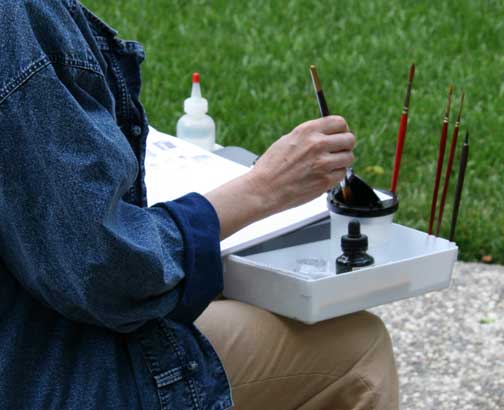
Imagine working in less than perfect conditions, either in the field or in my classroom where there are no individual desks. You might want your supplies conveniently accessible on your lap. In college I put my pad on my lap, held my ink bottle or wash palette in one hand, and reached down to the floor to rinse my brushes with the other. If you don't want to do it the old fashioned way, make the lap desk I designed (below), or design your own. There is a growing community of sketchers which communicates online about gear. For example, here is http://sketching.cc/forum. In "Sketch Talk," you can see what others are using. http://sketching.cc is the home page where you can explore the many links provided. As you explore other artists' kits, keep in mind, they tend not to use traditional brushes with water tanks, but waterbrushes, only. Waterbrushes streamline portability, but prevent subtle control over large, simple, pigment washes, which I want you to try. I also want you to stay with black pigments, only, for this class.
How to make this laptop organizer
This organizer is designed with room to place pencil, eraser and pens to the right of individual wash jars. The paper towel is clipped to the narrow tray, which also holds the water squeeze bottle and straight edge.
Parts:
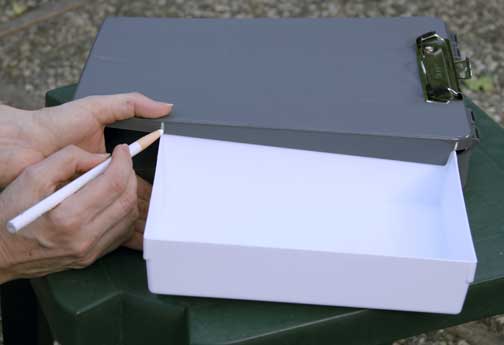
- Eldon (polypropylene plastic) Storage Clipboard, gray color.
Manufacturer # used online: RUB-10764
The sticker with bar code on back has a number: Storage Clipboard 50940.
The sticker shows it is made by a division of Newell Rubbermaid.
(available at Office Depot, or online)
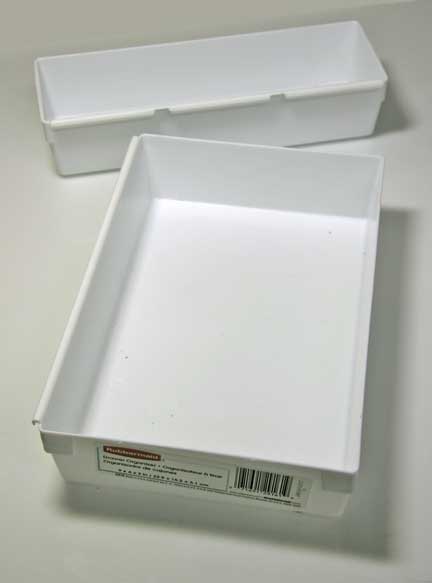
- Two Rubbermaid Drawer Organizer trays (try Longs, Rite-Aid, or most variety stores):
9 X 3 X 2
9 X 6 X 2
- From Tap Plastics
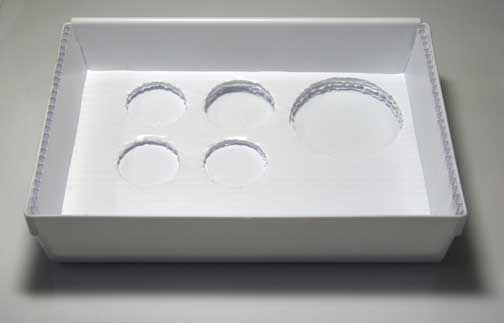
Five or six plastic pill jars:
Clear, 1 1/2 inch diameter, screw top (these appear to be leak proof). These are good as tiny palette units for tube paint and dilutions, and for keeping wet half pan watercolor cakes from leaking all over. BTW, rectangular watercolor cakes can be embedded in the liner, like the demonstrated jars (see below).

- Also from Tap:
One white corrugated plastic sheet, slightly over 1/8 inch thick (NOT the 1/4 inch thick one!) - Small clip to secure rag to tray wall
- Printout at 100% scale (if no reference to percent, un-check "fit to page" box) of SingleLiner.pdf (legal sized), or OverUnderliner.pdf (legal sized) with Underliner.pdf (see below), available on the academic figure supply list page: http://academicfigure.com/info/supplies.html#advdwg
Instructions:
Allow 2 hours for construction.
Trays hook over clip board box edge and are pinched in place by lid, which snaps shut.
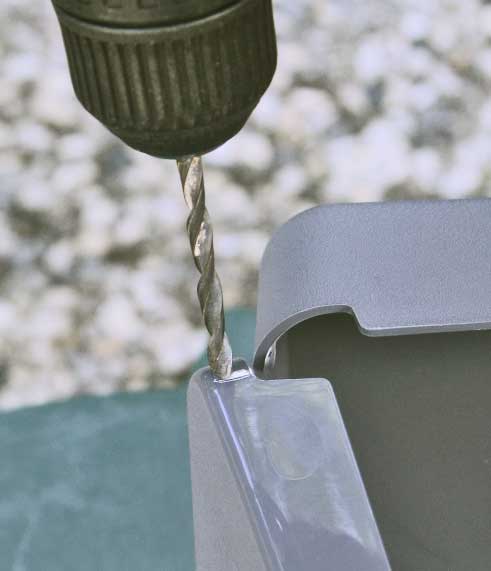
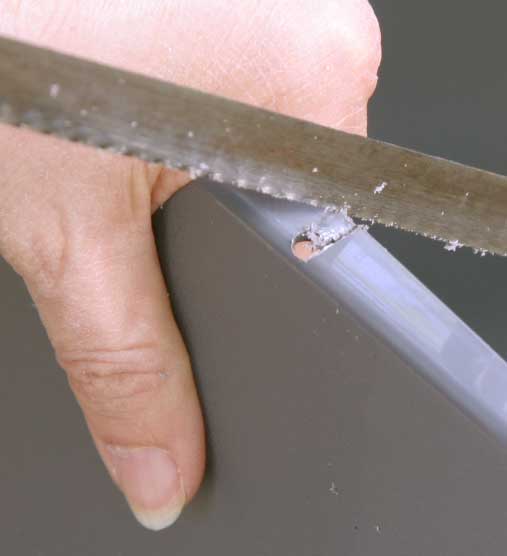
Slots must be cut in lid to accommodate trays. This demonstration shows slots cut in two phases, starting with drilling the holes. If you don't have a drill, the slots can be easily cut with a serrated knife.
- Align rim of tray against lid wall to find, then mark, correct slot locations.
- Drill hole, approximately 3/16 inch diameter, at the top of lid marks, just under the top of clipboard. The clipboard box is made of very soft plastic. It is easy to drill.
- Hacksaw slot sides, two cuts per slot.
- a. Print the liner -- SingleLiner.pdf, or OverUnderliner.pdf (see step 14 below for reasoning)
b. Cut out to the edge of the liner's outline
c. Trace liner to the corrugated sheet with a water soluble overhead projector pen.
If you didn't buy the corrugated plastic, ordinary corrugated cardboard traced with a pencil will work fine.
- Cut liner from corrugated sheet with scissors. The plastic is stiff, but relatively soft.
- The long flat side of the liner goes next to the clipboard (as described on the template). If you are right handed, the larger tray is placed on the right side of the clipboard, and the flat side of the liner is on the left inside the tray. If you are left handed, the larger tray is placed on the left side of the clipboard.
To turn the walls up, mark the fold line on the reverse side of the liner and score it
using a straight edge and X-acto knife. Don't cut deeply.
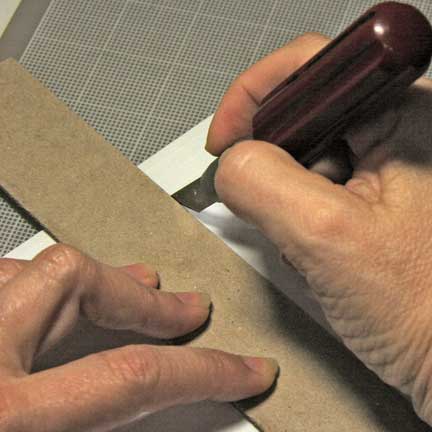
- Gently force the chambers to tear open along the scored line, as shown.

- Bend wall back. The uncut top face will not tear.

- Install liner in the wider tray and attach to box. Close the lid.
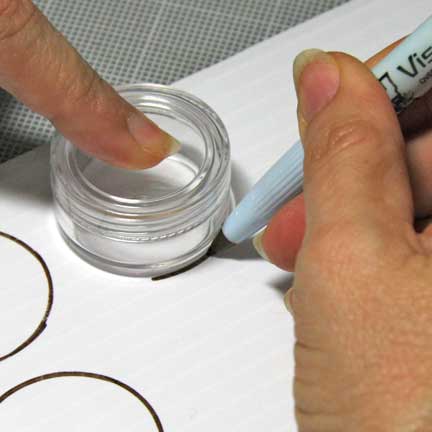
- Arrange your supplies in a way you like. Give this some thought.
- Once you know where containers go, remove liner, then trace their bases onto the liner. A water soluble overhead projector pen works well for tracing. Clean up with water after cutting.
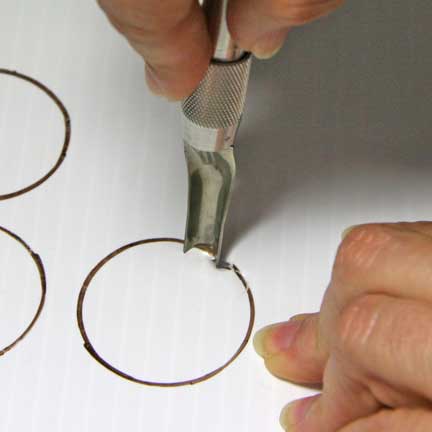
- Cut the holes. I cut mine by punching straight down all around the tracing with a large Exacto with Excel Chisel "U" Gouge blade.
The resulting cut edge will be slightly jagged, which helps hold the vessels snuggly.
"V" Gouge blades would probably work, too.
I cut the hole free by punching the opposite side, as well.
Be sure to put some sort of razor guard under the liner while punching.
There are probably several other good ways to cut vessel holes in the corrugated plastic.
- Vessels with vertical walls, like the little pill jars, should fit snuggly into holes. Containers with sloped sides or curved bases, like the Neatness Jar and ink bottle, will only be stabilized by this liner.
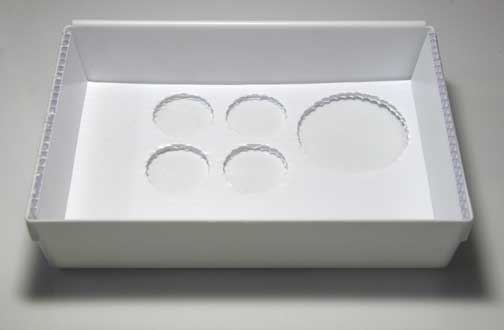
- At your option, you can make an underliner (Underliner.pdf) to deepen the holes. Adding underliner holes helps grip slope-sided or curved-bottom containers more securely. If you want two layers, make the liner from the OverUnderliner.pdf (not SingleLiner.pdf), then cut initial holes as previously described; trace holes you wish to be deeper to the underliner and cut. The pill jars don't need extra depth.
Here is a photo of double deep holes for the Neatness Jar and Ink bottle.
The pill jar holes are one liner deep.
You may design any variation that suits your particular needs.
- Hang both narrow tray and lined wider tray on the clipboard box sides, then snap the lid closed. My box shuts very securely, but if you want additional hold, wrap a strong rubber band around the front.
Use:
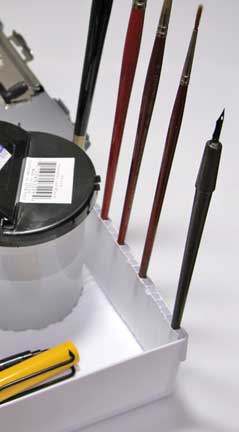
- While in use, brush handles can be put in upturned wall of liner, as shown. Use caution with pens, however, as some people might stab themselves with the nibs, if stored in this position. Pen nibs loaded with ink should be laid slightly down pointing in the tray, since if point up, ink will run back into the nib holder's grip cavity, then dribble out on the drawing next time you use it.
- All supplies for drawing should be removed from clipboard's storage box and placed in trays before snapping lid closed. If clipboard lid is opened while at work, trays could be knocked loose.